Things are circling some kind of belated conclusion in a sum-to-infinity style equation; as in, when one draws perpetually closer to something without ever reaching it.
The design has entered a state of flux, what little scraps of direct sunlight I'm able to gather from the formidable Saxon weather are scrambled frenetically about in, testing what's been made and discarding all the things that turn out not to work. The little micro-updates have been appearing on the Facebook page, but once there's actually something to show, photos and jubilation will appear here.
Touch wood- I think it's not unrealistic to expect something very soon.
Friday, 1 October 2010

Sunday, 12 September 2010
A litany of failures, part one: liquid core light pipe.
 The original idea I had for transporting the energy once collected, and we're going back more than a year here, was a liquid core light pipe. Essentially a fat, squishy fibre optic cable.
This works through the principle of total internal reflection, whereby light bounces without loss off the barrier between two materials of reasonably different levels of refraction. Such as glass and plastic, or water and air, or in this case: silicon and mineral oil.

The latter being pretty ideal, as it's easy to get, very refractive, has a high boiling point, and optically clear.
The former is what killed it. Silicone isn't particularly ubiquitous, cheap or clear, but the thing that really makes it inappropriate for this is that due to it's micro-surface texture, it scatters the light too much. What you really want here is something nice and smooth, like Teflon FEP or AF.
Unfortunately, tho those would be perfect for the application in every way (AF 2400 has the lowest refractive index of any polymer, to the point that you can even use water as your core (trust me, that's impressive)), it's almost impossible to get your hands on. And expensive when you do.
As you can see the silicone pipe did basically function, but comprehensive transmissivity analysis (digital camera, laser pointer, piece of paper and photoshop's histogram function) showed that even over only a meter and without bends, only about 10% of light was making it out the other end. The rest being scattered through the pipe wall.
And I wanted to put hundreds of watts through the thing. I guess this is why most everyone told me this was not a likely idea.
But it's quite pretty. I capped it with glass beads and hose clamps, attached a small l.e.d. torch with reflective tape, and am now using it as a rather dim light for my room.
So, since this was not going to do what I wanted I went on to investigate heat pipes, which are actually very promising and worth future further inspection, but ultimately for simplicity's sake have opted for a heat transfer fluid thermosyphon. Like most everyone else.
Thursday, 19 August 2010
I've had an interesting realisation.
At no point have I known for sure that what I'm trying to make here will actually succeed. From the start of all this, over a year ago, I would always end sentences on the matter with 'if the thing works', and then laugh nervously.
But it didn't work.
The first three or four basic designs for the solarflower simply didn't function, as it turns out, and it's current form is almost entirely unrelated to them. For the first nine or so months of this project I was pursuing designs which were doomed to failure; my most feared scenario set to transpire over and over again.
And yet it's taken me this long to even notice.
The design doesn't matter.
Only the function, and the consequence.
I've seen so many mechanisms and systems pass through this thing, some of them beautiful, only to be discarded or consumed. It's a good thing. It's evolutionary.
Every death signifies an improvement, an approachment on purity of function through form.
There is always a solution... there is always a solution... there is always a solution...
Returned from the festival a few days ago, pleased to discover that after ten days of rain and wind the device was still structurally sound and hadn't exploded even once.
However, as I was stripping the reflector to upgrade a bit of wood I made the potentially catastrophic discovery that mylar sucks.
Every single piece of dust, every spot where the metal mesh touched it, every spattering of guano had somehow eaten a tiny hole in the reflective surface, leaving only the clear plastic backing. Holding it up to the light the damnable thing resembles a starry night sky of disappointment.
The two days of internet research which followed would be best described as 'feverish'; due partly to the fact that my stress levels always elevate a bit towards the end of projects, but mainly because I knew full well that:
Mylar, my default option from day one, was now going to be completely unusable,
The list of alternatives was very small, possibly zero,
And the inability to locate one would pretty much kill this entire project.
As of this morning the list runs to just one item: aluminium kitchen foil.
I've always heard that this is about the worst thing you can use; it's a bastard to work with, scatters the light too much, and is poorly reflective. Early research on marijuana cultivation forums seemed to confirm it.
However, closer reading turned up that there's no real reason this should be the case, as aluminium is one of the most reflective metals, running about 85-95% reflective through white light and well into near infra-red.
Caught a train to town, got a roll of the most reflective looking stuff I could find in the supermarket, taped three lengths together and whacked it in the assembly.
The results are very interesting.
The focus is about half as tight as the mylar thermal blanket, ie 10-12 mm as opposed to 5ish. Still pretty good. However the amount of energy is (according to my incredibly precise method of sticking my hand in and seeing how much it hurts) a lot higher. Like, 50% higher, even at the half concentration.
This, I think, means two things.
The thermal blanket, as well as sucking at durability, also sucks at reflectance.
and
Aluminium foil is a lot more reflective than it's generally given credit for.
I'm really happy to have discovered this, as though it requirs a somewhat careful workflow to avoid tearing, foil is by far the most accessible and ubiquitous reflector material in the world. That it turns out to also be one of the most effective has a lot of ramifications for home made solar.
And, yes, I'm aware that I hardly discovered it. About 90% of projects I've seen have used kitchen foil, but pretty much all of them have made what looks to be the mistake of gluing the foil to a backing material. It desperately wants to crinkle, and it's the crinkling which makes it almost useless. -You've got to stretch it-.
It also loves to tear, but taping the edges and any holes seems (touching wood) to resolve this. If it doesn't hold up in the field I'll just cover the entire back with stickytape. It's cheap enough.
So, if Google led you here because you're researching reflector materials, know this: aluminium foil rocks. Use it.
(There's pretty much no other affordable option.)
Tuesday, 3 August 2010
So you know how I insisted that I wouldn't be leaving here until the prototype was working? Lies. Tomorrow I'm heading for the Ecotopia festival for a week.
There are three reasons why this is necessary.
First, I really need a break. I haven't officially shunned the project for more than three days since I was last in Edinburgh, in November.
Second, it's set to rain, and as the next step is plugging the tracking system together and seeing if it works, I'll be needing some sun.
Thirdly I've mounted up the collector and want to leave it for a while to see if it blows over/blows up/rips in half or gets messed around by the weather.

All plugged together it's still on about 20 grams to turn it, which is about a quarter what I was expecting.
So that's good news.
Wobbles like a bastard tho, haven't managed yet to devise a decent couple for attaching the collector to the main shaft. That'll get done when I'm back.
Saturday, 31 July 2010
Wolfram Alpha has just released a widget maker based on their computational knowledge engine, which for the geeks among us is pretty damn exciting.
Well...
I'm excited.
This one I made is for calculating solar noon for a given location, the time at which the sun is highest in the sky and vertical shadows run exactly north-south. This is very handy, as it's by far the easiest way to accurately aim your solar collector.
Well...
I'm excited.
This one I made is for calculating solar noon for a given location, the time at which the sun is highest in the sky and vertical shadows run exactly north-south. This is very handy, as it's by far the easiest way to accurately aim your solar collector.
Saturday, 10 July 2010
New wheel and gearing assembly.
Well, it's official. With the removal of the washing machine hose universal joint, opting instead to just tilt the whole gearing and attaching the collector directly to it, there is now not a single aspect of the device left from the original prototype I did in Australia.
Over the last year every single part of this thing has been replaced or heavily reworked, often four or five times over.
This is a mixed bag, emotionally.
As in the case of abandoning the 'bubbles rising against an immersed wheel' in favour of the current 'pumping liquid up to pour over wheel' which at a stroke removed two major construction issues but also made completely redundant at least two months hard work on getting the thing sealed.
The wheel is another example of this. As you can see in the video it's bidirectional, because up until a week ago resetting the device each morning required a whole seperate heat engine running the wheel, and thereby the collector, in the opposite direction. Now tho I'm working on a more simple and effective return mechanism involving a heat switch, which makes the bi-directionality of the wheel rather pointless. It was a lot of thought coming up with that design, rather than just mount the cans directly on to the shaft.
I'm going to keep it how it is, however, for three good reasons:
1) It's the same effort to make either way.
2) This design is a bit more efficient and avoids a problem with dead spots.
3)
And 4), I guess, it could be of use to someone who needs a really efficient, low revs high torque, bi-directional water wheel.
Collector improved.
 The first attempt was too wrinkly, and the tape used to pull the mylar tight was slipping a bit in the heat, so instead of pulling out points on the surface with the gaffer have instead lined the peripheries with bike spokes and flexible wire, pulling out the entire edge uniformly with cable ties.

I've also added two extra bits of wood lengthways to support the mesh, as it was bowling a bit in the middle.

This has the effect of making the thing pretty much perfect.
 I'm actually amazed how accurate the shape is, as you can see here; the focus is about 5mm wide, which is I imagine what you'd get from a professionally machine produced reflector.
Just to reiterate that this has so far cost me about €10 in materials and can be whacked together in a couple of hours with a jigsaw and a drill.
I tested the balance and it's about 50 grams heavier on one corner, so two medium size bolts should bring it back to perfect, thereby having the thing require practically zero force to rotate.
Saturday, 3 July 2010
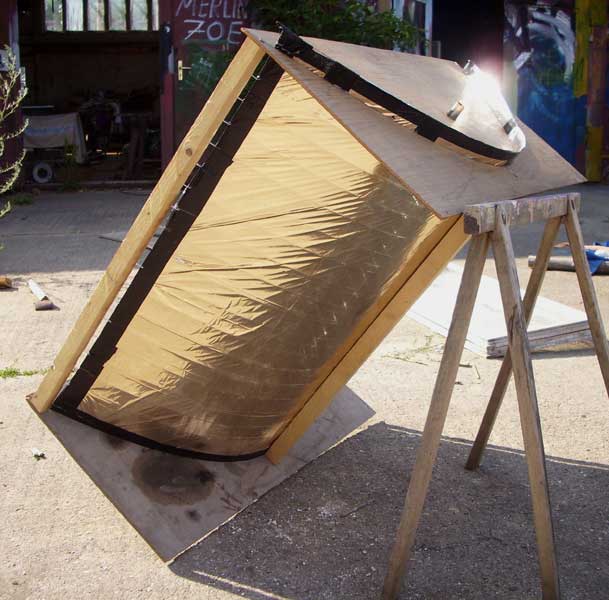
Main parabolic trough collector.
 So this is the main solar collector,

just shy of one kilowatt (one square meter). Worked out pretty easy to make; just some wood, an emergency thermal blanket and a sheet of wire mesh (and quite a bit of gaffer tape, tho the next version won't rely on that so heavily).
All up about €10 and two days work, tho most of that was figuring out how best to do it.
The hotspot is significantly tighter than I was realistically hoping, about 5mm from a 50cm aperture, or 100x magnification. And that's with it not really made quite as well as it could've been, a few surface deviations and wrinkles which don't need to be there.

Wednesday, 16 June 2010
The heat engine which drives the device has been going through some considerable metamorphosis since I realised that what I originally had, ie ethanol bubbles working upwards on a submerged wheel; was not going to work.
I spent two months trying to get the system completely sealed (which, to my restrained pride, I eventually did), but the main problem was that in order for the bubbles to not immediately collapse the whole volume of ethanol would have to be heated to just below boiling. Doable, but an extreme hassle.
So I had the idea to instead pump liquid up and pour it into the wheel from the top. Tried a bubble pump, which worked but not well enough, improved this to a kind of geyser pump; better, ended up with some kind of weird steam-piston-by proxy hybrid thing which worked quite nicely, but still only about 30% of what I'm after.
The obvious solution was to insert some little mechanism which alternately switched on and off the flow of gas. That previous link has the reasoning why.
This has taken me the last six freaking weeks to solve. I've come up with at least half a dozen ways of doing it, but they all require some fairly precise and tricky components, which rules them all out.
This one little thing has, in all seriousness, been the hardest thing I've ever had to design. It's such a tiny thing, but I haven't been able to move on without it.
Finally, after burning through more brain kilojoules than the device is actually likely to produce, I think I've hopefully solved it: by completely redesigning the entire apparatus and kind of avoiding the problem altogether.
The trick was to use much less ethanol, so that it boils itself out after pumping enough for one correction, then refills. I probably should have thought of that earlier...
So this is the Connell Pump. Not very powerful, grossly inefficient, but absurdly easy to make and I'm actually quite proud of the design. It works good, and more importantly; it works at all.

- At the bottom right is the boiler, which holds about 2-3 ml ethanol.
- This boils and the vapour enters the 'chamber' (the half blue, half white (liquid and gas)), forcing out the liquid, which goes to the main reservoir.
- This continues until the eths in the boiler has boiled off to the extent that it can no longer overcome the rate of re-condensation in the chamber, which starts to suck, so to speak.
- This draws liquid from the reservoir, which passes through the boiler, shutting off the boil, the pressure drops quickly and the chamber and boiler refill with liquid.
- Two valves (the only moving parts) keep all this going in the right direction.
- Repeat.
Tuesday, 15 June 2010
Ok, let's get back into this.
The last couple months have been kind of crazy, at least in terms of physical relocation. This partly explains the lack of updates here, the rest being a combination of internet inaccessibility and traditional procrastination.
After leaving Malaga (what an interesting day that was), I stayed a few weeks with a friend in Madrid before heading south again to a farm in the Sierra Nevada where there was no electricity, running water, tools, workspace or shelter, but potentially at least sun.
The sun lasted a week before being replaced by the worst snow and rain in Andalusian history. Roads subsided, buildings collapsed, people died. I went back to Madrid to wait it out. That ended up taking a month.
I don't know if you've noticed, but in terms of precipitation, the whole world's gone freaking nuts.
While there I tried to get a light pipe going, as a means of transporting the energy collected by the device. It worked, but not well enough, so I started looking instead at heat pipes. More on this later.
Returned to Sierra Nevada, found out about a skill sharing camp in Germany so popped up there for three weeks, returned to Sierra Nevada, discovered that the complete lack of resources there was just not going to be ok, returned to Germany which is where I am now.
The Traumschule is an ex military barracks, currently stocked with materials, workspace and tools, and is a little bit of heaven when you're trying to actually get something done. If you've seen the episode of Red Dwarf where Lister is infected with the Luck virus, and rather than look for things simply takes two steps and literally trips over precisely what he wanted; that's exactly what it's like here. There's a whole room full of nuts bolts and screws, and five rooms of bike parts.
Plus the crew are real nice, and even the weather isn't bad and getting better.
Makergasm.
Two things I've been incessantly repeating for the last eight months to the point that they literally have no meaning any more:
I'm nearly finished.
I'm not leaving here until this thing is done.
However, I am, now, nearly finished, and I'm not leaving here until this thing is done.
Subscribe to:
Posts (Atom)